Do you have fresh picked beans that you are dying to drink? Do you want to magically transform these little beans into go juice?! Well now is where you will learn about the different methods and ways of coffee processing and how you can do them at home.
So, now that you have your harvest of fresh, dark red, sweet coffee cherries it’s time to process these little guys and get them one step closer to being that all important energy kick everybody needs in the morning.
This is actually a very important step in the process of making coffee.
If done incorrectly you can ruin your crop by inviting mold to the party, over drying the beans, having bad weather roll in or have pests attack your harvest!
Having a ruined harvest at this point is devastating! but don’t worry with some attention and a little knowledge you can have the perfect cup of homemade coffee!
There are a few different methods of processing coffee beans that I will go over with you, some are easier than others but I believe they can all be done at home.
Another thing to keep in mind before choosing a processing method for your beans is that each different method will actually affect the flavor of your final brew.
I will give a brief description at the end of each technique to describe how each method commonly affects the taste.
Quickly, before we do that, let’s take a closer look at the coffee cherry and learn a few terms and best drying environment.
Understanding the anatomy will make these methods easier to visualize.

a coffee bean taken out of its skin. You can clearly see the pulp layer inside the skin and the mucilage surrounding the beans.
The outer red layer is the skin.you can see inside of that layer the pulp layer that I refer to as it’s guts. The bean is covered in a layer that is slimy and sticky at the same time, weird right? It’s called the mucilage layer.
Parchment layer – This is a layer that remains on the coffee bean after the skin,pulp and mucilage have been removed and the bean has had time to dry.
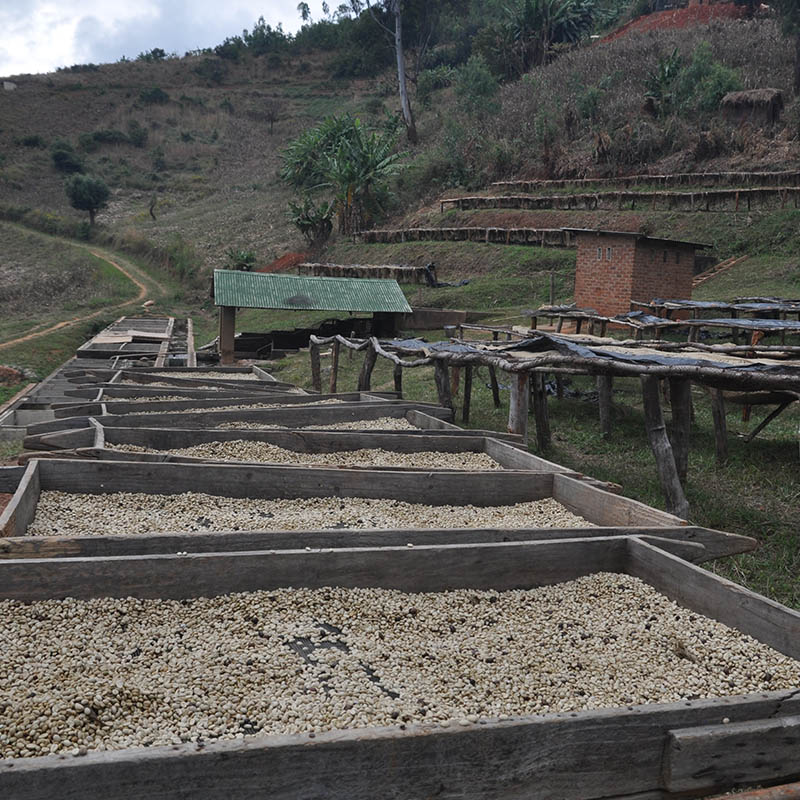
Drying – It’s important to know the correct conditions for drying. To get the best bean,it’s key to have a gradual drying process.
Consistency is key. Too much heat and your beans will dry unevenly, trapping moisture inside the bean.
Not enough heat and poor air circulation can encourage mold growth.
Beans are ready for further processing once they have reached approximately 10% moisture content.
According to coffee research each method of coffee processing will have different drying times.
Semi-washed will take 8-9 days
sun-dried will take 12-14 days
Wet processed(washed) will take 6-7 days.
These are all rough averages. Your coffee may take more or take less depending on your conditions.
Note: as long as temperatures around your coffee do not exceed 122 degrees Fahrenheit your coffee quality will not be diminished.
So, finally to the methods.
Method 1: Semi-washed
This method is super easy to do at home. All you have to do is separate the outer red layer of skin from the bean.
This will leave you with a bean that is still covered in its mucilage layer. From this point you can just lay your beans out to dry.
Easy as that!
The beans are in a moisture rich environment that invites mold and bacteria.
So just make sure to keep a close eye on them during their first 6-8 hours.
If you have your beans laid out on a patio or something similar like a concrete driveway, to dry make sure you roll them around 2-3 times a day.
Laying the beans out on a screen mesh that is raised off the ground to allow for better air flow is becoming a more popular method.
Coffee processed this way tends to have a taste that is deep and fruity with a creamy texture.
Method 2 :Sun-dried
All Natural! The sun dried method is probably the oldest method in the book and is still practiced all over the world.
This method is super simple, all you have to do is pick the fruit and lay it out completely intact.
No need to remove the skin or anything! This may sound like the easy way but don’t be fooled. While the beans are drying you will have to keep a close eye on them.
Beans processed this way take about 2 weeks(roughly, depending on environmental conditions) to reach the appropriate moisture level. During this time bacteria and fungus can attack your beans and make them rot. Having rotten beans will add sour tastes to your final cup of coffee.
If you see any beans that are moldy you should toss them out. Traditionally concrete patios are used to dry the beans. If you have a corner of unused driveway that would be great or you can always lay the beans out on a tarp in your yard.
Again raised drying trays are becoming a more popular option.
Turning the beans is essential to even drying. I like to use a simple rake or outdoor brush to turn the beans easily. Lots of people claim that coffee that is processed this way has a much fruitier taste, a taste similar to blueberries!
Method 3: Wet processed
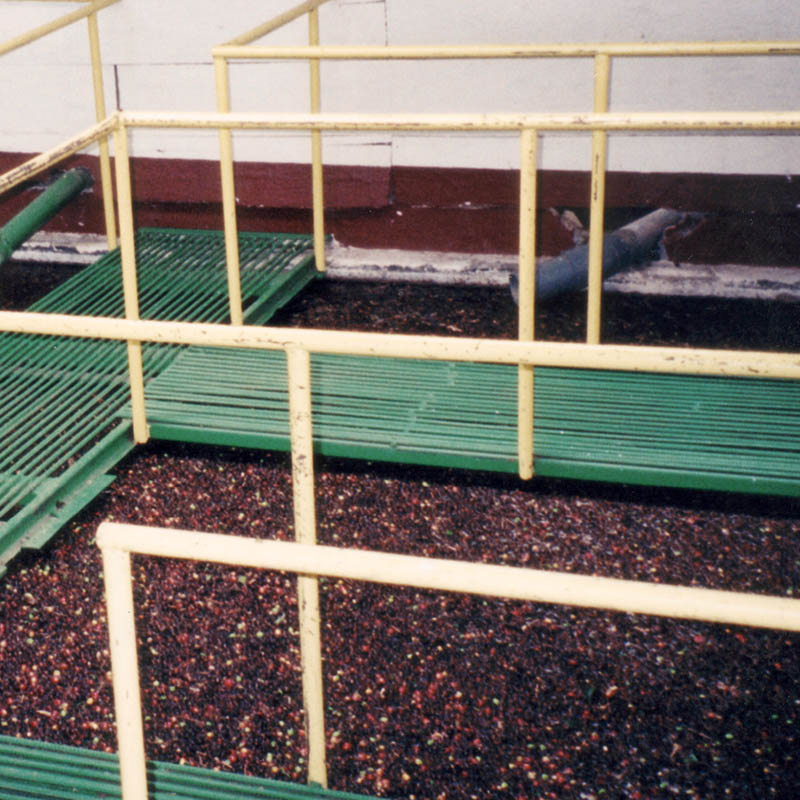
This is the most popular method used in the world, After the coffee cherry is harvested you remove the skin and the pulp, leaving the bean covered in its mucilage.
From here the beans should be placed into a clean container of water to ferment. Check your beans after 24 hours and see if the mucilage layer can be easily rubbed off.
If you can, rinse the beans a final time. All that remains around the bean now is the parchment layer. Lay them out to dry like I mentioned in the sun-dried method, keeping an eye on them while they dry to about 10% moisture content.
Fermentation is actually an art form, I don’t do it any justice with this description. This stage can dramatically affect the taste of your final cup of coffee.
beans processed this way are said to show the true flavor of the bean, really exposing environmental and farming conditions that affect the flavor of the final product.

Home Coffee Processing tip:
If none of these options are available to you there is still a way! Say you don’t have a patio or a driveway space to lay your beans out. You can always use a dehydrator! This is a nice alternative to the common processes that commercial farms use.
Since you will be working on a much smaller scale you will have complete control over the conditions that your coffee is in. No need to worry about the weather!
A good dehydrator will have a variable temperature control to ensure that you have the proper temps to dry your beans.
Remember the temperature must not exceed 122 degrees Fahrenheit, temperatures above that will diminish quality.
You can always use a food dehydrator if none of these options are available to you and it works great.
How to tell if your coffee is at the correct moisture content:
According to the Queensland government there is a simple trick to tell if your coffee is ready to move on to roasting.
After drying there is just a parchment layer remaining around the bean. this layer is britle and will easily crumble when touched. your bean will be a tan-ish color, similar to straw.
Cut open a bean and look at the inside. It should appear completely dry and be a pale green/grey color. If the center looks kinda soft or some what moist let your beans dry a little longer.
You can see that each method of processing coffee beans can produce different results to your final cup of coffee.
The different methods of processing will give you distinct flavors and present different challenges to think about. The size of your operation I think will be the deciding factor. It doesn’t matter which method you choose. All methods can produce a great cup of coffee.